
You may remember a few weeks back I posted the above secret sneak peek of a craft my sister & I worked on as party favors for babygirl's first birthday party.
And then yesterday I posted this pic from the party:
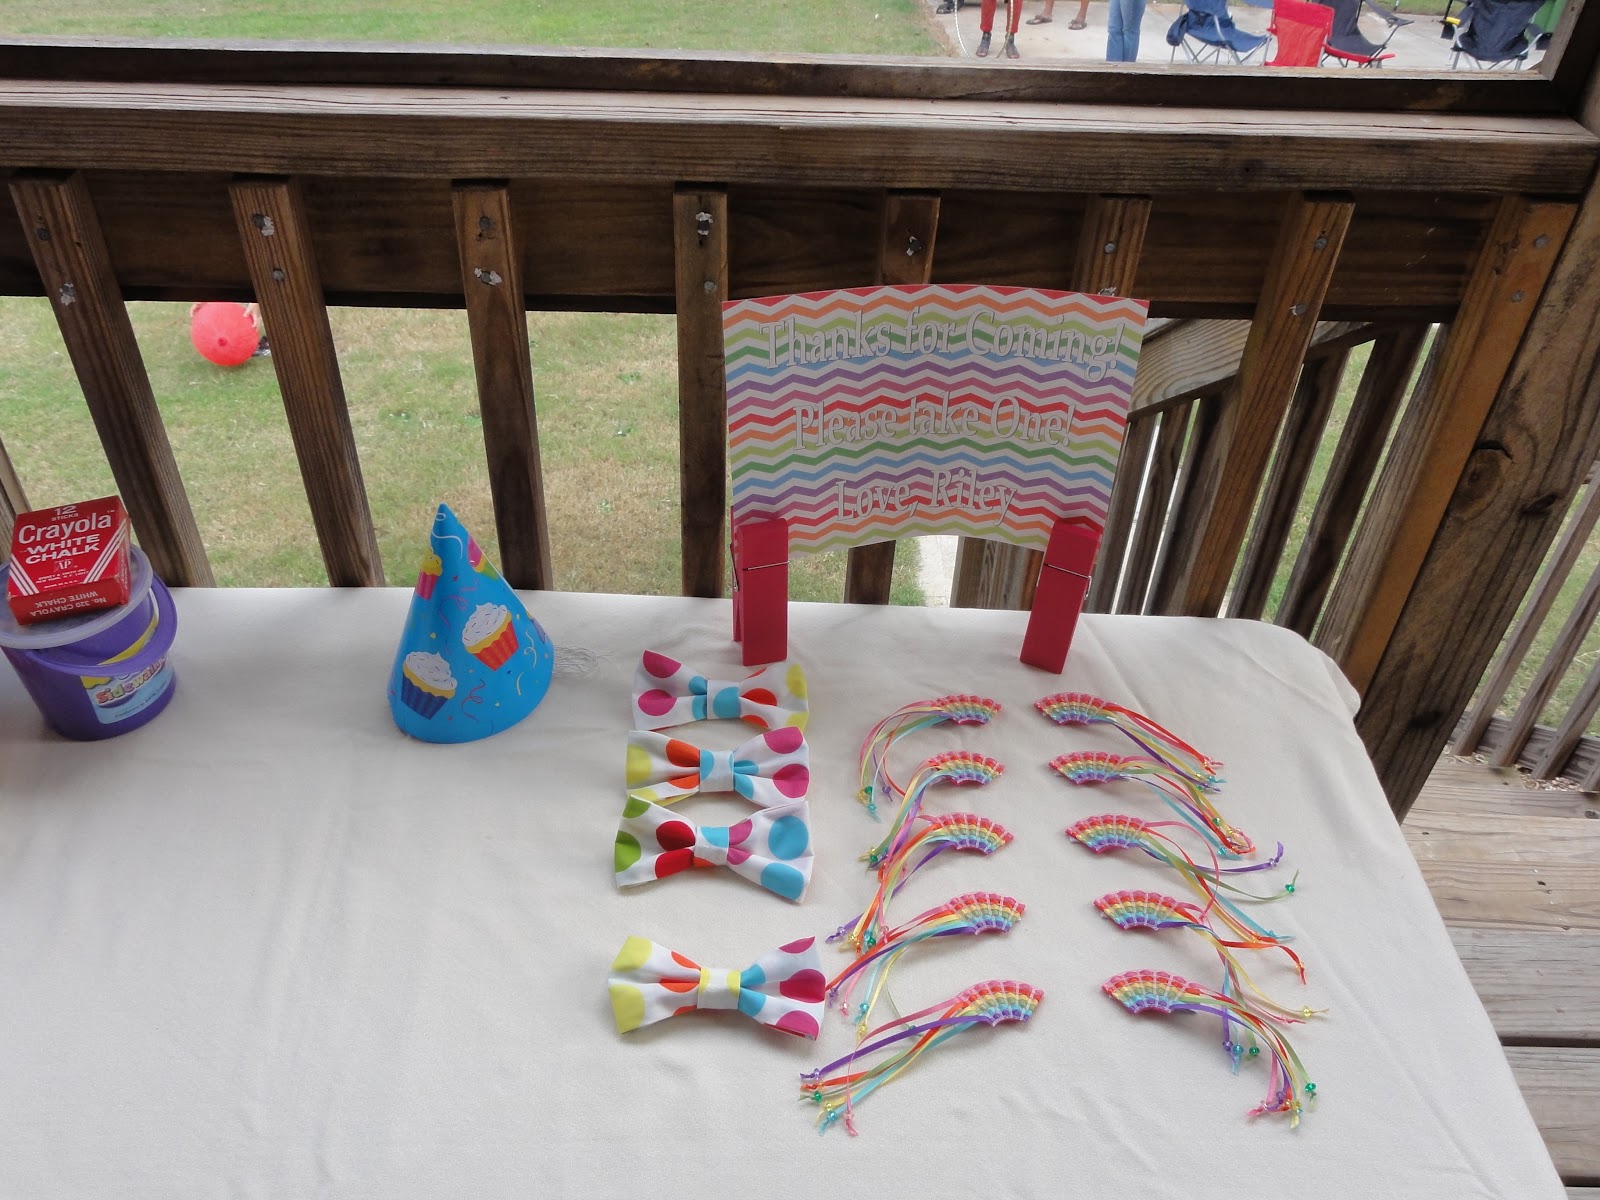
And that's the big reveal: Rainbow Hair Barrettes!! (I also made the bowties for the boys at the party, tutorial for that will come soon!)
When I settled on a subtle rainbow theme (I don't love overly theme-y parties) for babygirl's party, my sister called me up and said, remember those rainbow hair barrettes mom used to make, we should make those as favors!! I had already been thinking I wanted to make barrettes & bowties, so the idea was perfect. She came down to visit about 6 weeks before the party, and we thought it would be the perfect time to get crafty. Boy oh boy, we were almost blind & crossed-eyed after making a batch of these barrettes- I don't know how my mom used to do it!! But it was super fun and the results are sooooo cute.
I didn't take pics as we were crafting (why do I always think of these things after the fact??), but the steps are pretty simple.
Supplies:

The most important supply is that round plastic grid that's difficult to see. I'm not sure what they're called, but you can get them at Michael's in a pretty large pack. We cut ours into 4, and then trimmed three rows from the inside (pointy end) to make the arch of the rainbow. Kinda wish I had a pic to show you, but I don't. I'm pretty sure you can get the idea if you look at the finished barrette. We trimmed 3 rows so we could have a total of 6 rows since we had 6 colors of ribbon, but you could do it however you like! Also, when our mom made these barrettes back in the 80's she cut the circle in 2 instead of 4 pieces. Initially we were going to do that too, but the girls at the party were all going to be little and a full arch seemed too big & overwhelming for little heads. Either way they will be super cute!
Next, weave the ribbon through each row, leaving a long tail on one end and a shorter bit on the other end to back-weave through the backside so you have a nice clean edge. I tried to get a pic of that here:

The back weaving is a bit tricky, but not too tough, and I think it was important to be sure the ribbon was nice & secure. We didn't measure the ribbon or the tails, we just kind of eye-balled it. Also, we got giant needles to help with the weaving, but neither of us found them useful, and just used our fingers instead.
Once all the ribbons are woven through, string a tiny bead on the end of each ribbon and secure with a knot.

The next step is probably unnecessary, but we thought it gave them a nice finished look. I had a few sheets of felt with adhesive backing, so I traced the rainbows onto the felt, cut them out, and stuck them to the back of the barrette. It made the back look all nice & neat, and was a perfect surface to glue the barrette/clip onto.
And here's where this project went awry for a moment... We looked & looked for a barrette or clip that would fit on the backs of these rainbows and would work for little girls hair. We thought we had the perfect solution in some little plastic barrettes (just those cheapy ones you can get 20 for .99). So here's a pic after I glued a barrette onto each rainbow and then used binder clips to hold the glue in place:

Genius, right? Wrong! Once I let the glue dry overnight, I gave the barrettes a little tug, and off peeled the barrette. Ugh. And worst of all, there was a glue impression of the butterfly on the felt. So, back to the drawing board. I removed all the felt, re-cut & re-applied it to the back of the rainbows, and then went on a search for a better barrette/clip. I settled on some metal ones I found, but I wanted to fancy them up a bit, so I used some grosgrain ribbon I already had to cover the metal barrettes, and then glued them to the fresh bits of felt:

And that's all there is to it! Finished product:


I know I made it sound a bit complicated, but we really didn't know what we were doing! My mom used to use nylon thread and sew metal barrettes to hers, but the metal barrettes were the type that need a lot of hair to grip, and since these were for toddlers/babies, we just didn't think that would work. I think the clips we got were perfect, but as my sister pointed out, the direction I glued them in likely wasn't the best for putting the barrettes in your hair (when the tails hung to the left, I had the clip "pointing" to the right. My thought was the tail hid the clip a bit, but this also made clipping it in your hair a bit awkward). Oh well, live & learn. All the little girls seemed to love them!!
Here's a pic of my sister with the birthday girl & her rainbow barrette. I purposely put it way back on her head so she wouldn't pull it out!

And here's a silly little pic of the girls in our immediate family each wearing a barrette. Can you spot them all??

Cris, feel free to chime in if I missed anything on this tutorial!!
No comments:
Post a Comment
I LOVE comments!! They make my day, so please don't be shy!!